Introduction
Mountain bikes (“MTB”) are designed for off-road cycling on unpaved terrain, including dirt, rocks, sand, and gravel. They are purpose-built for handling difficult riding environments containing steep grades, streams, vertical drop-offs, and miscellaneous obstacles. Some design elements of MTB that address the rigors of off-road cycling include a suspension, large knobby tires, rugged wheels, powerful disc brakes, and low gear ratios necessary for tackling steep grades offering little traction.
The popularity of mountain bikes has undoubtedly come a very long way in a relatively short period of time. Mountain biking got its start in the early 1970s in Marin County, California when a few friends began modifying standard bicycles, so they could race each other down local hills. The California mountain biking legend Joe Breeze is credited with handcrafting the first purpose-built mountain bike known as Breezer 1 in 1977. The frame was composed of chromoly tubes brazed together. It was the first bicycle frame designed specifically for the rigors of mountain biking. The introduction of Breezer 1 was a seminal moment in cycling history. In fact, it’s part of the collection at the Smithsonian Institution National Museum of American History.
The first mass produced mountain bike was the 1981 Specialized Stumpjumper. In 1982, only 5,000 units were sold, but just a year later, sales rocketed to 50,000 units for 1983. Mountain biking had become a mainstream sport with sales numbers to back it up, but MTB sales still accounted for only a fraction of overall bicycle sales at the time. However, by 2012, MTB sales accounted for the largest percentage of total sales among the different categories of bicycles sold at the nation’s 4,000-plus specialty bike shops. In a little over three decades, mountain bikes have gone from selling only a few thousand units to becoming the industry’s sales leader.

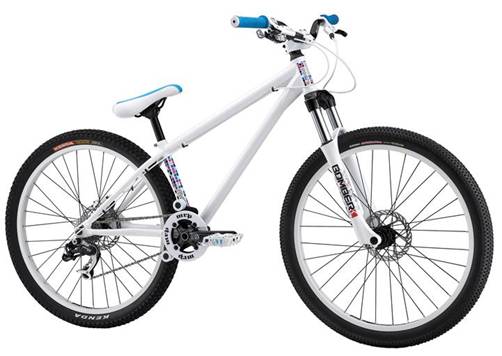
Parts of a Typical Mountain Bike
Subcategories of Mountain Bikes
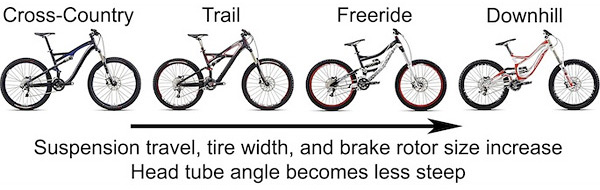
The popularity of mountain biking has exploded since those early days in Marin County when a group of friends just having a good time racing each other down local hills unwittingly launched an entirely new global sport and category of bicycle. Since those humble beginnings, the sport has fragmented into five generally recognized main subcategories: (1) Cross Country, (2) All-Mountain, (3) Downhill, (4) Freeride, and (5) Dirt Jump. Each of the subcategories has its own specialized mountain bikes designed to tackle different types of terrain and obstacles, and each type of MTB has its own advantages and disadvantages. It’s important to understand that even within each of the subcategories themselves there is a wide range of designs and available features that result in significant differences among bikes within each subcategory. The first step in choosing a new MTB is to understand where and how you intend to ride and what types of obstacles you will encounter while riding.
Cross Country
Cross Country mountain bikes (also referred to as ‘XC’ bikes) are designed for off-road trails containing minimal to moderate obstacles. These bikes tend to be light and nimble, making them ideally suited to tackling steep ascents, tight turns, and high speeds. They are not suited for high impact jumps and landings. Cross country cycling is the most well-known and least extreme form of mountain biking. But it enjoys the highest rates of participation at both the recreational and competitive levels. Cross Country bikes are generally lightweight (about 20 to 30 pounds) and are built for climbing hills as well as racing along extended stretches of relatively smooth trail at high speeds. They customarily have suspensions but tend to be the most rigid bikes of all the subcategories since they are not intended for extreme biking.
Cross Country bikes are further subdivided into two categories based upon their suspension: (1) hardtail and (2) full suspension. Hardtail bikes use a suspension fork at the front to provide some cushioning and improved grip but lack any rear suspension. Full suspension bikes have both front and rear fork suspensions, which allow them to handle the roughest terrain, but the trade-off is that they typically weigh more than hardtails and are slightly less efficient. For an in-depth discussion of these two types of suspension systems, see the Suspension section of this Buying Guide below.
Cross Country Mountain Bike
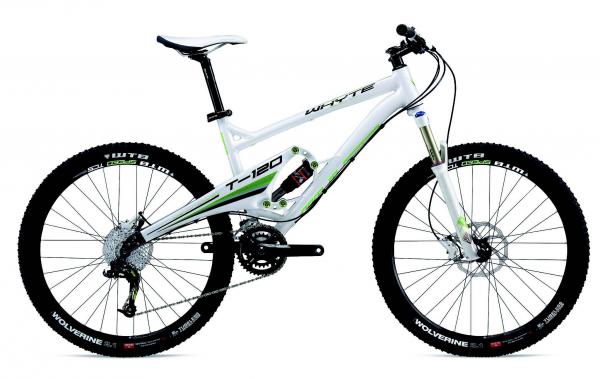
All-Mountain
All-Mountain bikes (also referred to as ‘Trail Mountain Bike’) are extremely versatile; they are designed and constructed to handle practically every type of riding condition a mountain biker will encounter in a full day of riding. They are a cross between a Cross Country bike and a Downhill bike in that they pedal uphill relatively easily yet confidently handle challenging downhill riding at high speeds. All-Mountain bikes combine the performance of a Downhill bike with the comfort of a Cross Country bike.
All-Mountain bikes are made with more heavy-duty and durable components than Cross Country bikes, so they generally weigh more. They are outfitted with a full suspension, allowing them to tackle rough terrain while still providing a relatively smooth ride and good handling. These bikes strike an excellent balance between performance, control, efficiency, and comfort.

All-Mountain Bike
Downhill
Downhill mountain bikes are designed for riding on downhill slopes and tracks at relatively high speeds. Downhill cycling can be thought of as alpine skiing, but on a specially designed bicycle. Cyclists start at the top of a hill or mountain and descend at high speeds. Downhill cycling is widely regarded as the most dangerous type of mountain biking and is among the most extreme of any cycling sport, so Downhill bikes usually weigh more than other types of mountain bikes because they are constructed with very rugged parts to withstand the punishing and unforgiven riding conditions of downhill cycling.
Downhill mountain bikes are specially designed for fast mountain descents. They are equipped with large tires, full suspensions, disc brakes, chain guides, and heavy duty frames. Additionally, they have large or high gears with head angles slack at about 63 degrees. Simply put, this means the frame geometry of a Downhill bike moves the rider farther back relative to the center of the bike, and the front wheel is farther out in front. This riding position allows Downhill bikes to handle very steep downhill descents without the rider being pitched forward and tumbling over the handlebars. The drawback is that Downhill bikes are suited only for dedicated downhill riding since their riding position makes them impractical for other types of cycling. In fact, they are frequently transported to the top of mountains by vehicle or ski-resort chairlift.
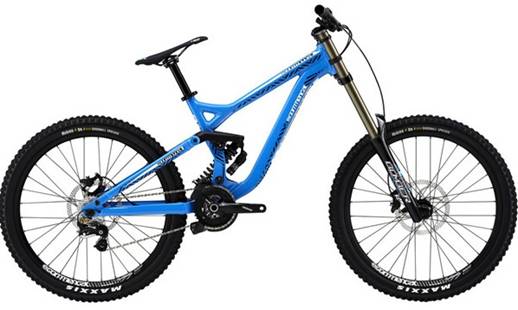
Downhill Mountain Bike
Freeride
Freeride mountain biking is a relatively new subcategory of mountain biking whose popularity exploded in the mid-1990s as the X-Games broadened its reach to mainstream audiences. The term ‘freeriding’ was borrowed from snowboarders. Freeride mountain biking means riding without an established course, goals, or rules on mountainous terrain; it’s riding off-road trails as creatively as possible. Freeriding terrain is unique often including natural trails and hazards as well as man-made obstacles such as bridges, teeter-totters, steps, and drop-offs. Many freeriders describe it as riding that combines practically every conceivable aspect of mountain biking that the rider is brave and imaginative (and some would suggest foolhardy) enough to attempt.
Freeride mountain bikes are extremely versatile and are designed to withstand almost anything, including traditional trail riding, big jumps, climbing and descending hills, aerial stunts, and technical maneuvers. They generally are equipped with ample suspensions and constructed with heavy duty parts and materials. While Freeride mountain bikes are often used to ride the same steep mountain descents as Downhill bikes, they tend to have slightly less suspension and smaller wheelbase and are lighter than dedicated Downhill mountain bikes.
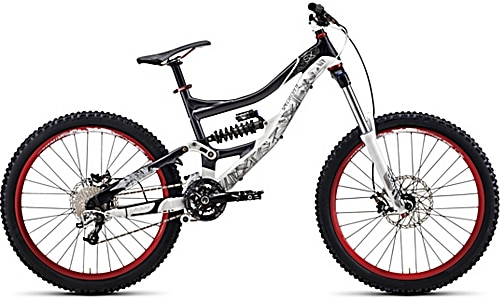
Freeride Mountain Bike
Dirt Jump
Dirt jumping is the sport of riding specially designed mountain bikes over shaped mounds of dirt or soil in an effort to get airborne for a long period of time. These bikes are preferred by riders who enjoy spending time with their wheels off the ground executing aerial stunts. Enthusiasts often construct their own jumps to perform airborne stunts and tricks with riders routinely achieving heights of over 15 feet in the air. It’s less known by the general public than the other mountain biking subcategories, and riders are more likely to dirt jump more for leisure than for competition.
Purpose-built Dirt Jump mountain bikes are minimalistic and very strong in order to survive the inevitable crashes as well as the constant high-impact pounding during normal riding. They generally have a smaller frame than other subcategories of mountain bikes. They are also characterized by having a single speed, a rear brake only, short suspension travel, oversized handlebars, lower seat posts, and smaller wheels.
Dirt Jump Mountain Bike
Major Components of Mountain Bikes
Suspensions
Up until the early 1990s, mountain bikes had rigid frames and forks. Then the first suspensions were introduced, which made riding on mountainous terrain easier, safer, less physically demanding, and more fun. The primary advantages of mountain bike suspensions include:
- Comfort—shocks absorb bumps instead of the rider’s body.
- Control—suspension helps keep bike under control by accurately tracking the terrain instead of bouncing and deflecting off of it wildly.
- Traction—suspension helps keep rear wheel in contact with the ground, allowing pedaling to produce more forward movement.
However, adding a suspension to a bicycle does come with some trade-offs. Although the presence of a suspension provides increased comfort and control, it also increases overall weight and maintenance requirements while at the same time decreases pedaling efficiency. Modern suspension systems are lightweight, reliable, and efficient enough that their benefits outweigh the disadvantages for most riders.
- Weight—modern suspensions are composed of numerous individual parts, which inevitably adds weight.
- Maintenance—all those additional parts require regular maintenance in order to keep the suspension operating properly.
- Efficiency—with a bike suspension, a portion of the power produced by pedaling goes to compressing the suspension rather than moving the bike forward, resulting in a loss of efficiency when pedaling.
Today, there are two main types of suspension systems found on modern mountain bikes—those with only a front suspension (referred to as ‘hardtail’ bikes) and those with both front and rear suspension (referred to as ‘full suspension’ bikes). Most riders have a clear preference for one over the other with full suspension bikes currently the more popular choice.
Suspension Forks
Front suspension is achieved through the use of suspension forks. The basic design of a front suspension fork includes telescoping tubes with a steel spring or pressurized air inside. Nearly all modern suspension forks are upright, which simply means that a smaller diameter upper tube (referred to as a ‘stanchion’) slides into a larger diameter lower tube (commonly referred to as ‘lowers’ or ‘sliders’). The two most widely used methods to absorb impacts and then rebound back are:
- Coil Spring (wound steel)—system provides a linear compression rate, resulting in smooth, consistent impact absorption over the full range of spring travel. Coil springs come in different resistance rates which are matched to an average rider for the size of the frame upon which the fork is attached.
- Air Spring (pressurized air in the chamber)—system provides a progressive compression rate, meaning it is softer during the initial portion of travel and then becomes stiffer as more compression is applied. The primary advantage of air springs is their lighter weight compared with coil springs.
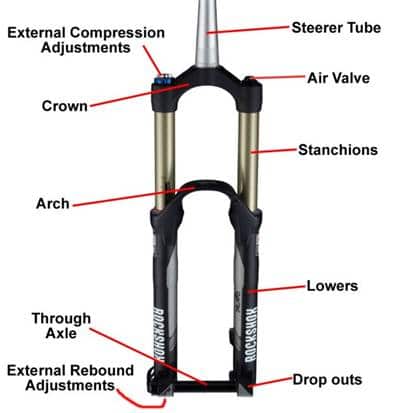
Suspension Fork
Rear Suspensions
Modern mountain bike frame design for rear suspension is a relatively complicated subject the fine points of which are well beyond the scope of this Buying Guide. For our purposes, it’s sufficient to understand that the rear suspension involves the use of one or more pivots (design element connecting two components by a rotating bearing or bushing) that allow the rear wheel to travel up and down and push on a rear shock. The ideal location of the pivot or pivots and the manner in which the frame pushes on the rear shock are subjects of intense debate and disagreement among riders.
The primary functions of a mountain bike suspension is to keep the wheels in contact with the terrain at all times and to cushion impacts caused by rough terrain on the rider. To do so, suspension designs have to contend with multiple forces, including pedaling and braking, not just ground impact. The necessity of handling these multiple, simultaneous forces explains why full suspension frame designs are so complex. Even so, no frame design yet is able to perfectly address all three factors, but the best designs do a good job of striking an acceptable balance among them.
While there are several suspension frame designs currently on the market, the two most common today, with numerous variations, are the single pivot and the four bar linkage.
- Single Pivot—this is the classic rear suspension frame design that places the pivot above and in front of the bottom bracket. The rear wheel is fixed on a swingarm (or cantilever) with the pivot located on the front triangle, and the shock in between. The single pivot design is the simplest type of rear frame suspension. Its simplicity is the main reason for the design’s enduring popularity. Since there are relatively few moving parts, single pivot suspensions are durable, versatile, light, and easy to maintain while still being highly effective.
Variations of this design focus on positioning the pivot higher or lower. A lower pivot placement provides more active feel and less pedal-bob (up-and-down bobbing motion that results in loss of acceleration due to the compression of the suspension); whereas, a higher pivot point generally does a better job of absorbing large impacts.
- Four Bar Linkage—this type of rear frame suspension creates a four-sided polygon through usage of linkages and components utilizing the chainstay, seat stay, rocker, and seat tube. This design creates a virtual or floating pivot point that provides a plush ride without compromising braking power. This type of suspension provides better suspension action while braking than single pivot suspensions. However, since there are more moving parts than with single pivot suspensions, they require more maintenance and tend to be heavier. There are several variations of the basic four bar design with each possessing distinct advantages and disadvantages.

Four Bar Rear Suspension
Rear Shocks
The rear shock lies at the heart of any full suspension mountain bike frame. Rear shocks are comprised of two telescopic tubes that slide into one another; some type of spring mechanism; and an eye at either end through which the shock is attached to the frame. A bushing in each of the eyes allows the shock to pivot smoothly when the suspension is active. While there are numerous variations on the basic shock design, every shock features some type of spring mechanism that compresses under force, and virtually all models contain some manner of damping system that regulates the rate at which the spring compresses and how it rebounds. Some rears shocks are also equipped with a lock-out mechanism that enables the rider to disable the use of the shock when it’s not required. This helps eliminate excess bobbing motion when riding on terrain that doesn’t necessarily call for the use of a full suspension.
Rear shocks are divided into two general categories based upon the type of spring mechanism they employ. Which type you choose will depend largely on the type of mountain biking you do, your budget, and personal preference.
- Coil Spring—this type utilizes a large metal spring (typically steel) that serves as the shock body. They are heavier than the air spring variety. Coil spring shocks provide linear compression, meaning they feel and behave the same through all stages of compression and are less prone to bottoming-out than air spring shocks. For riding disciplines where weight is not that much of a concern, such as downhill and freeride, coil spring shocks have plenty of fans.
- Air Spring—this type utilizes compressed air inside the body of the shock. Air spring shocks are very versatile and can be adjusted precisely for different rider weights or riding preferences by simply increasing or decreasing the air pressure in the shock with a pump. Air spring shocks are naturally progressive, meaning the force necessary to compress the shock increases as it compresses. This results in a feeling that the shock becomes increasingly stiffer the more it compresses. They are also lighter than coil spring shocks, but they are generally more expensive.

Coil Spring Shock
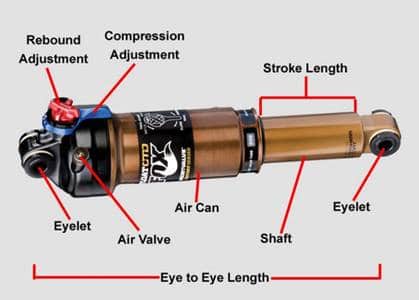
Air Spring Shock
Travel
‘Travel’ refers to the distance a suspension will move until it is fully compressed, i.e., the total available compression. More available travel provides a softer spring rate and allows the shock more time to handle impacts. The appropriate amount of travel is dictated by two main considerations—(1) style and type of riding and (2) type of terrain on which the bike is used. The available amount of travel ranges from about one to ten inches. The amount of travel available in the front fork also affects steering and control. Less available travel equates to more responsive steering, and greater available travel results in slower steering, which actually feels more stable when riding downhill.
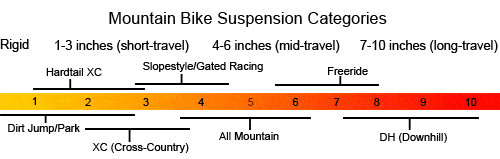
Full suspension systems are generally categorized by the amount of travel available, so full suspension mountain bikes are typically referred to as short, medium, or long travel.
- Short Travel Bikes—typically have one to four inches of travel and are the lightest full suspension bikes available at about 22 to 28 pounds. These type of bikes are especially good at climbing and often feature shocks that can be locked out (compression feature temporarily disabled) for maximum pedaling efficiency on smooth terrain. Cross County and Dirt Jump bikes fit into this category.
- Medium Travel Bikes—have about four to six inches of travel which can often be adjusted depending on the climbing demands. These types of bikes are generally equipped with more heavy-duty and durable components than short travel bikes, making them better suited to tackling more demanding terrain. They weigh about 26 to 34 pounds. Their popularity has exploded in recent years because many riders find that they strike an ideal balance of light weight, available travel, and strength. All-Mountain bikes fit into this category.
- Long Travel Bikes—boast seven to ten inches of travel. These bikes are constructed with extra heavy-duty parts, wheels, and tires capable of withstanding the extreme pounding that they are expected to endure. They are typically outfitted with hydraulic disc brakes with gigantic eight-inch rotors for maximum speed control during extreme riding conditions. Long travel bikes are designed for going downhill at high speeds and absorbing huge impacts, but those design features make them terrible for climbing. These bikes are usually the heaviest types since maximum suspension performance and durability are more important than weight for riders. Downhill and Freeride bikes fit into this category.
Frames: Geometry

Mountain bike frame geometry refers to the various lengths and angles of frame tubes and other components that comprise a mountain bike frame. Every angle and tube length make up a frame’s overall geometry. The geometry of a bicycle affects the ride characteristics and overall feel more than any other single part or factor. Bikes intended for the various mountain biking subcategories have frame geometries specifically geared toward the particular riding conditions encountered in each subcategory. The specifications of the following items affect a mountain bike’s ride and feel the most.
- Head Tube Angle—this is a measurement expressed in degrees of the head tube at the point where the top of the fork passes through the frame. As a reference point, 90 degrees is straight up and down. Any configuration with a head tube angle less than that means the bottom of the fork is farther away from the center of the bike than the top.
Steep head tube (and seat tube) angles, i.e., close to 90 degrees, position the rider over the center of the bike for powerful and efficient pedaling, and the front will travel in a straight line when climbing. However, when riding on really rough terrain or downhill, this forward riding position can easily result in the rider tumbling over the handlebars since the rear wheel is prone to lifting off the ground. Cross County mountain bikes are examples of bikes with this type of frame geometry.
For riding downhill and over rough terrain, a “slack” geometry is preferable. This means that the head tube and seat tube angles are lower, moving the rider farther back in relation to the center of the bike, and the front wheel is farther out in front. This frame geometry configuration enables the front wheel to strike obstacles at an angle that allows the fork to absorb the impact and permits the wheel to travel up and over the obstacles. The tradeoff is that they are terrible at riding uphill and have a natural tendency to “wheelie out,” i.e., flip over backwards. Downhill mountain bikes are examples of bikes with this type of frame geometry.
In between the two head tube and seat tube angle extremes just discussed are mountain bikes designed to strike a practical balance between good hill climbing and descending. This is achieved by configuring frame geometries somewhere in-between the two extremes. All-Mountain bikes are examples of bikes with this type of frame geometry. These are often the types of bikes on display at bike stores.
- Seat Tube Angle—this measurement is also expressed in degrees. The same general principles regarding head tube angle apply to seat tube angle.
- Chainstay Length—is measured from the bottom bracket to the point the rear wheel attaches. Generally, a longer chainstay results in a bike that tracks well and easily travels in a straight line. Whereas, a shorter chainstay brings the rear wheel closer to the center of the bike and makes it easier to get the front wheel off the ground to maneuver over obstacles easily. Chainstay length also affects a bike’s overall wheelbase length. Longer wheelbase allows for more stability at high speeds, and shorter wheelbase allows for tighter turns. Additionally, bikes constructed with short chainstays climb and accelerate well, but since the saddle is positioned directly over the rear wheel, the rider feels more road shock compared to bikes with long chainstays.
- Wheelbase—is the distance between the front and rear wheels measured at the points where they come in contact with the ground. The wheelbase length affects how quickly a bike changes direction; how easily it absorbs impacts; and how comfortable the overall ride feels. As a rule of thumb, the shorter the wheelbase, the quicker the bike turns and the more responsive it is. The longer the wheelbase, the more stable it feels and better able to hold a straight line.
Wheelbase length also determines how much the frame can flex, which affects rider comfort. A shorter wheelbase possesses less vertical flex, resulting in the transmission of more shock to the rider. On the other hand, a longer wheelbase flexes vertically to absorb shocks, which provides a relatively comfortable ride over rough terrain.
- Travel—maximum distance a bike’s suspension can compress. For hardtail bikes, travel refers to just the front fork, and for full suspension bikes, it refers to both the front and rear suspension.
Frame Geometries of Mountain Bike Subcategories
Frames: Materials
The next factor to take into consideration is frame materials. When it comes to mountain bike frames, the goal is to provide great strength while weighing as little as possible. This is achieved through multiple means, but the primary factor is the material used. The most commonly used materials vary greatly in terms of strength, stiffness, and density (or weight). As a result, the optimum frame design for each material also varies. It’s important to note that two frames that are constructed of the same material can still possess vastly different ride characteristics attributable to differences in frame geometry, assembly, tube shapes, and material manipulation. Outstanding MTB are made from every type of frame material on the market. Which is best for you depends upon your desired ride characteristics, usage, and personal preferences. The most widely used types of bicycle frame materials are as follows.
- Aluminum—Aluminum is a popular choice for mountain bike frames because it’s light, strong, and stiff, which provides an outstanding balance of strength and light weight. Frames made of aluminum are stiffer than most steel and titanium frames due to the ability to use larger diameter tubes, which explains the prevalence of “fat-tube” frames. Stiffness allows for improved handling and acceleration during sprints and climbs. Many mountain bike riders believe that bikes with suspensions need to have the stiffest frame possible while still being lightweight, and aluminum is the material of choice to satisfy those requirements. They believe that the natural springiness of steel and titanium is actually a drawback on bikes with suspensions because all those components need to have a stiff frame for optimal performance.
On the downside, the big, thin tubes of aluminum frames result in easy crash damage, but aluminum is not easily repaired or straightened. Aluminum is more brittle and more susceptible to failure through fatigue or damage than steel. As a result, a single dent in the wrong place has the potential to cause catastrophic damage and render an aluminum frame unsafe to ride; whereas, steel is more durable and easily repaired. Aluminum breaks before it bends while steel bends before it breaks. With the inevitable pounding and damage most mountain bikes will endure, some riders shy away from aluminum frames, especially if they intend to keep a bike for many years.
Aluminum is also used for most bicycle components, such as stems, cranks, and handlebars. Aluminum is easily formed into various shapes, so tubes made of it can take many shapes—square, triangular, fluted, etc. Another benefit of aluminum is that it won’t rust. Aluminum frames are excellent for Cross Country and Downhill bikes, but they aren’t as highly regarded for hardtail, long ride mountain bikes.
- Steel—was the most commonly used material in first generation mountain bikes. Although it’s heavier than most other frame materials, it is still a popular choice today because it offers an outstanding strength-to-weight ratio and is relatively easy to repair, which is of great value for mountain bikes given the pounding they receive.
Steel is stiff but is also dense (or heavy). It is heavier than aluminum, but extreme lightweight isn’t a decisive factor for some types of mountain biking subcategories such as dirt jump where strength and durability are of greater importance than weight. Steel is also ideal for hardtail bikes due to the metal’s flexibility that provides natural shock absorption. Steel is one of the most durable frame materials available; it can withstand dings, scratches, dents, and even bend yet still retain its structural integrity. The durability of steel is especially useful for mountain bike frames, which will inevitably sustain damage during normal riding. Steel tubes are always cylindrical and nearly always between one and one-and-a-half inch in diameter. A drawback of steel frames is that they are prone to rusting.
There are several subcategories of steel currently used in making MTB frames. For example, the staple of steel frames for decades has been High Tensile (Hi-Tensile) steel. It’s relatively cheap and easy to work with, but it’s also relatively weak. So lots of it have to be used to achieve the necessary strength, which adds weight. In fact, Hi-Tensile steel is the weakest and heaviest type of steel used in modern bicycle frames. It’s the steel found on most mass-produced bargain bikes sold at the big box stores.
Chromoly is another popular type of steel used in making MTB frames. It’s actually a steel alloy (combination of steel, chromium, and molybdenum) developed to be lighter, stronger, and more durable than Hi-Tensile steel. Chromoly allows manufacturers to build thinner frame tubes with reduced weight. In general, most mass-produced steel framed bikes priced over $400 are made of chromoly.
Recent technological advancements have led to an even higher quality type of steel called Air-Hardened steel. These steels provide the best strength-to-weight ratio of any steel commonly used in making bicycle frames. Reynolds 853 is a well-known example of the new class of Air-Hardened steel. The benefit of utilizing this type of steel in bicycle frames is especially apparent in the weld areas. Unlike conventional steel alloys, strength actually increases in the weld areas after air cooling. As you would expect, the stronger and lighter the steel, the more it costs.
- Titanium—(commonly referred to as ‘Ti’) possesses the best strength-to-weight ratio of any known metal. It’s considered the middle ground of frame metals since it’s not as strong as steel and not as light as aluminum. However, many cyclists believe that titanium combines the best ride characteristics of the other metals, resulting in a lightweight aluminum-like frame with the ride comfort and strength of steel. Devotees of titanium also swear that it produces a sprightly ride with precise handling, which makes the frame feel alive. Though for full suspension mountain bikes, that same natural springiness of titanium is regarded as a disadvantage by some mountain bikers. Even riders who aren’t as passionate about titanium agree that it provides a unique ride with fantastic road feel, vibration dampening properties, and unexpected stiffness. The surprising combination of ride comfort and high performance make titanium bikes perfectly suited for everything from leisurely long distance rides to high speed racing. Titanium doesn’t rust, so frames don’t have to be painted.
Titanium is relatively rare and is a notoriously difficult material with which to work. It’s hard on metalworking tools and requires great skill to make into a quality frame, which is why titanium frames are so expensive to produce. Titanium frames are also difficult to repair, which is an enormous drawback for some subcategories of mountain biking such as freeride, downhill, and dirt jump. It is considered an excellent frame material for hardtail mountain bikes with its combination of strength, lightweight, and natural springiness.
- Carbon Fiber—is a fiber composed of carbon. Very thin filaments of carbon are bound together with a plastic polymer resin using heat, pressure, or a vacuum to form carbon fiber sheets, which later are cut and layered into complex shapes used in the production of bicycle frames. There are five grades of carbon fiber, four of which are used in bicycles, which helps explain why there are such extreme variations in price even among carbon fiber MTB. Carbon fiber frames are renowned for being strong yet lightweight and durable. It’s easily molded into unconventional and exotic shapes. In fact, there’s virtually no limit to the ways in which carbon fiber can be manipulated, which means it can be fine-tuned to create practically any ride qualities a rider wants. Carbon fiber frames are expensive and prone to impact damage, so they are used primarily by serious competitive mountain bikers.
Wheels
Wheels play a vital role in a mountain bike’s ride quality and which type of terrain the bike can handle since they are the direct contact points with the ground. Most mountain bike wheels today are made of aluminum. While weight affects a bike’s ride characteristics, wheel size and rim type have emerged in recent years as the primary factors to consider when choosing wheels. That is not to suggest that wheel weight should be ignored since reduced wheel weight improves a bicycle’s climbing, acceleration, and handling. But for mountain bikes, lower weight should not take precedence over durability requirements for the particular type of riding intended.
Wheel Size
Today, modern mountain bike wheels vary in terms of both diameter and rim width. Mountain bikes were originally designed with 26 inch wheels in mind, and that was the standard and only size readily available for many years. This meant that all the tires, rims, suspensions, and frames on the market were designed for use with 26 inch wheels. Then 29 inch wheels were introduced and have grown steadily in popularity. Soon afterwards, 27.5 inch wheels became available. The availability of components for larger wheel sizes should be taken into consideration when shopping for a MTB. Larger wheels can’t be mounted on a bike designed for 26 inch wheels. Rather, most bike components have to be redesigned specifically to fit each of the larger wheel sizes, and even the frame geometry has to be redesigned to accommodate the newer sizes. As a practical matter, components for the newer wheel sizes are not as widely available as they are for 26 inch wheels.
- 26 Inch Wheels—are the lightest and stiffest wheel option at comparable price points across all available mountain bike wheel sizes. The smaller diameter results in a more agile and faster accelerating bike on smooth terrain. But because 26 inch wheels strike obstacles at a steeper angle and drop into holes easier than larger wheels, they clatter and lose speed faster while riding through rough terrain. Top Downhill mountain bikes still use 26 inch wheels. Since 26 inch wheels were the industry standard for decades, everything related to the size is readily available just about anywhere.
- 5 Inch Wheels—are the latest wheel size option for mountain bikes. They combine agility, strength, and traction. This size is billed as a logical compromise between the other two wheel sizes that represents the best of both. That is, they roll over bumpy terrain and small obstacles better than 26 inch wheels while also providing better acceleration and sharper handling than 29 inch wheels. Some riders believe that while 27.5 inch wheels are good at several things, they don’t do any particular thing extremely well as is the case with the other two wheel sizes. That is, 27.5 inch wheels are viewed by some as a jack of all trades, master of none.
- 29 Inch Wheels—these are currently the largest wheel option available for mountain bikes. They have a distinctly different feel than the other two smaller wheel sizes, which is not appreciated by all riders. They provide improved traction and stability and roll over small bumps very smoothly. They also handle descents well and instill a feeling of confidence when riding over the rockiest terrain. However, acceleration is slower and takes much more effort to get them up to cruising speed. Nor do they handle twisty, tight turns well. Finally, smaller riders tend to find 29 inch bikes difficult or at least awkward to ride.
Rims
The latest trend in mountain bike rims is increasing width (internal rim width, not external). The standard rim width had been 19mm, but today the typical width ranges from 21mm to 23mm with some models as wide as 30mm or more. Wider rims provide increased stability and traction, but those advantages come with a weight penalty. So riders need to strike the proper balance between added traction versus added weight when choosing the ideal rim width for their individual riding needs.
Another factor to consider is whether to choose traditional wheel-and-tire or tubeless type. Each type has its advantages and disadvantages. While the topic can spark heated debate between proponents of both types, which is best for an individual rider comes down to personal preference.
- Traditional—this type utilizes an inner tube within the tire itself that inflates with air and determines the ride characteristics and feel of the tire. Traditional wheels remain popular because they are easy to install and maintain, and they are relatively inexpensive. They are also easy to repair while out riding.
- Tubeless—as the name indicates, this type of rim is setup without the use of an inner tube. This design involves the use of a tubeless valve, rim tape, sealant, and tubeless ready tire to produce a sealed system. The absence of an inner tube allows the tire to run at a lower air pressure without the risk of pinch punctures. This results in greater traction and absorbing properties while riding over rough terrain. But tubeless setup tends to be more difficult to install and repair than a traditional setup.
Tires
There’s an extremely wide array of mountain bike tire choices currently on the market. There are numerous factors to take into consideration when shopping for tires. The most basic ones include wheel size, tire width, tread pattern, and tire compound. Which tire is right for you will depend on the type of riding you do.
- Wheel Size—first, the tire size needs to match the size of the rim. Mountain bike tires contain a number pairing located on the sidewall formatted as follows: 26 x 2.0. The first number is the diameter measured bead-to-bead. As previously discussed, mountain bike tires come in three sizes—26, 27.5, and 29 inch.
- Tire Width—is a critical factor in the feel and performance of a mountain bike. In the tire number format 26 x 2.0, the second number represents the tire width in inches. In general, a wider tire provides greater stability while cornering and traveling at high speeds, especially on bumpy and loose surfaces. But thinner tires roll, accelerate, climb, stop, and change direction faster. Cross Country bikes are typically equipped with tires ranging from 1.8 to 2.2 inches in width. All-Mountain and Downhill bikes generally come with tires ranging in width from 2.1 to 2.4 inches.
- Tread Pattern—as a general rule, more tread means more grip, but it also means more rolling resistance. Riders must strike the right balance between their speed and traction requirements. For the most part, mountain bike tires are grouped into a couple categories based on tread pattern.
Knobbies (maximum grip)—these are the traditional mountain bike tires that most people associate with mountain bikes. They have the large, familiar knobs protruding from them at all angles. Knobs cover the tire in pyramids, blocks, circles, and other geometric patterns. Knobbies perform extremely well on rough terrain and soft dirt and sand. They also work well for climbing and aggressive downhill riding.
Semi-Slicks (all ‘rounders’)—these are less aggressive versions of knobbies. They combine small knobs along the outside perimeter of the tire with smooth rubber down the middle. They’re designed for minimal rolling resistance and quick acceleration while providing good traction and grip. Semi-slick tires enable high speeds on hard-packed dirt and trails with large flat obstacles, but they don’t work well on loose surfaces such as sand and mud.
City Slickers (minimum rolling resistance)—these tires are the fastest of all mountain bike tires on hard and relatively smooth surfaces. They are made of a hard rubber compound that provides a stiff ride that almost feels like a road bike. They are not designed for use on loose material or rough terrain.
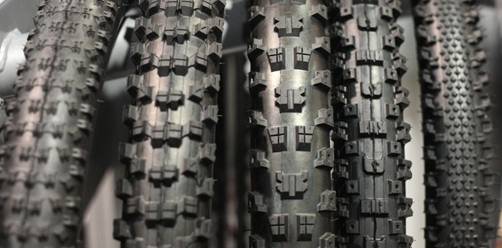
Various Mountain Bike Tire Treads
- Tire Compound—mountain bike tires commonly use a single type of rubber compound, either soft or firm. Soft and sticky rubber provides excellent grip, but they wear out quickly. Firm rubber is more durable but doesn’t grip as well. Many mountain bike tires these days are dual compound, featuring a firm compound on the center knobs for longer tire life and a soft compound on the side knobs for better grip.
Brakes
There are two general types of braking systems for mountain bikes—rim brakes and disc brakes. Disc brakes are currently the standard on most mountain bikes. If consistent braking performance in any riding condition is important but a little extra weight isn’t, then disc brakes fit the bill. On the other hand, if having the lightest setup possible is important and small variances in braking performance is acceptable, then the best choice is rim brakes.
- Rim Brakes—are the traditional braking system for mountain bikes. They work by rubbing on the rim to slow and stop the bike. Among the advantages are their light weight, lower cost, and easy to service and repair. Drawbacks include poor performance in wet or muddy conditions; require straight un-damaged rims; less stopping power than disc brakes; and over time, can wear through the side of the rim.
- Disc Brakes—most modern mountain bikes come equipped with some type of disc braking system. They work by causing a brake caliper gripping a disc (or rotor) attached to the center of the wheel. Similar to brake pads on rim brakes, disc brakes also have brake pads (also referred to as ‘shoes’). Stopping power is affected by the caliper and pad, but the component that has the greatest effect is disc size. The larger the disc is the faster it can stop the bike.
Disc brakes provide greater stopping power than rim brakes, and performance isn’t affected by rim condition or wet and muddy riding conditions. Additionally, disc brakes allow for greater control by providing progressive braking, i.e., braking power that increases in direct relation to how hard the brake lever is pulled. As a result, disc brakes are preferred by most mountain bikers. However, drawbacks include increased weight and cost as well as more complicated service and repair compared to rim brakes. There are two types of disc braking systems differentiated by the method used to actuate the calipers in forcing the brake pads to grip the disc—mechanical and hydraulic.
Mechanical—this type uses a steel cable to pull on the caliper at the disc. Mechanical disc brakes are less expensive and easier to service than hydraulic brakes. But they generally require more ongoing maintenance than hydraulic brakes because the cable tends to get clogged up with dirt and grime. Whereas, hydraulic brakes utilize a completely sealed hose system that isn’t susceptible to clogging.
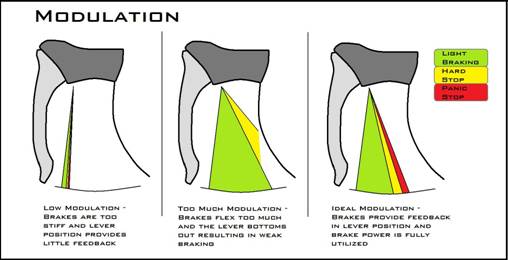
Hydraulic—this type uses a hose in transporting brake fluid to drive pressure onto the caliper that results in a clamping force onto the disc via the brake pads. Hydraulic disc brakes offer more stopping power and better modulation than mechanical ones. Modulation refers to the relationship between how hard the rider pulls on the brake lever and how hard the brake stops. No or very little modulation results in no or very little braking power and wheel lock with no middle ground in terms of stopping power. Ideal modulation allows the rider to utilize the entire range of braking power and to apply it evenly through the entire range of the brake lever, resulting in fine control over feathering the brakes, stopping firmly, or locking the wheel.
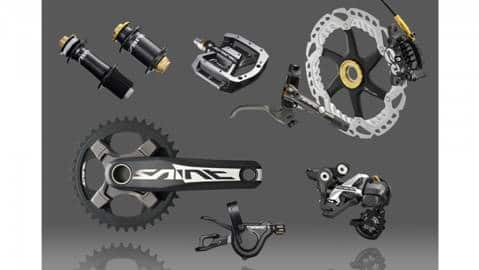
Group Sets
Groupset (also referred to as ‘gruppo’) refers to the collection of mechanical parts that make up a bicycle’s gearing and braking systems. These parts contribute to the overall weight of a bicycle. Just as with the bicycle frame, the balance between weight and strength of the parts must be taken into consideration and factor prominently into the price of groupsets. Another feature that affects price is how fast and sharply they shift. While all groupsets will shift gears, the more expensive ones do so faster and sharper. Complete off-the-shelf mountain bikes will often contain a mixture of different brands and component grades in the groupset in an effort to contain costs.
Groupset Components for Downhill and Freeride Mountain Bikes
The mountain bike groupset market is dominated by two brands—Shimano and SRAM. Each of these manufacturers offer different grades of components for every level of rider from beginner to professional competition-level racer. In addition, since mountain biking now encompasses so many individual subcategories, there are now subcategory-specific groupsets for the more extreme riding styles such as downhill and freeride. The main components of groupsets typically include:
- Cranksets (also referred to as ‘chainset’)—are the portion of a bicycle’s drivetrain that takes the pedaling power of the rider’s legs and uses it to drive the chain, which rotates the rear wheel resulting in forward motion. A crankset is made up of chainrings, crankarms (the long, straight parts connecting the chainrings to the pedals), and bottom bracket. Ideally, the crankset should be light and stiff. While cranksets are made of all the usual materials used on other parts of bicycles, most high performance cranksets today are made of either aluminum or carbon fiber. As a general rule, carbon fiber ones tend to be slightly lighter than aluminum, but aluminum ones tend to be stiffer. There are three types of front cranksets used on mountain bikes.
Triple—this is the classic type of mountain bike crankset. This type of crankset contains three front rings, with the largest frequently being a 42 or 44-tooth outer ring. The middle ring typically is a 32 or 34-tooth ring, and the smallest is generally a 22 or 24-tooth ring. This configuration offers the largest range of available gears.
Double—this crankset type features two front rings and is the most common type on modern mountain bikes. The larger outer ring is usually between a 36 to 42-tooth ring, which generally contains a gear that’s well suited for fast riding. The smaller inner ring is between a 24 to 28-tooth ring that makes ascending steep slopes easier.
Single—this type has one front ring usually between 30 and 38-tooth ring size. The single crankset has been popular on Downhill bikes for years where a large range of gears isn’t necessary but chain security is since a variety of other factors already make Downhill bikes ill-suited for climbing. But now the single is appearing on bikes in other subcategories of mountain bikes such as Cross Country bikes. The advantages of this setup are its simplicity and light weight.
- Cassettes—are the collection of cogs attached to the rear wheel and drive the bicycle upon pedaling. They are available in an enormous range of sizes and speeds. Most modern mountain bikes utilize 9, 10, or 11-speed cassettes. Like with most parts of a mountain bike, which to choose is dictated by riding style and conditions. With the exception of Downhill bikes, most modern mountain bikes are equipped with a cassette containing a wide spread of gears because riding a flat road in contrast to a steep trail requires a major jump in gears.
Cassette sizing convention is written as follows: 11-32t. The first number indicates the number of teeth on the smallest cog, i.e., the highest gear, for quick pedaling at speed. The second number refers to the biggest cog, i.e., the lowest gear, for climbing hills. The closer the two numbers are together, the narrower the range of gears. For example, an 11-21t cassette has a narrower range of gears than an 11-34t cassette.
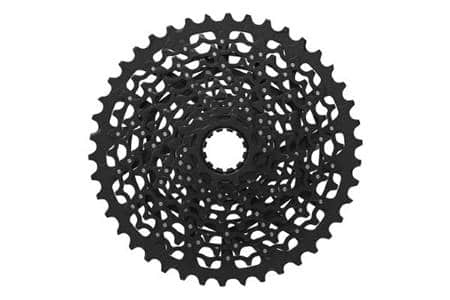
Modern Mountain Bike Cassette
- Chains—connect the crankset in the front to the cassette in the rear. Modern bicycle chains are roller chains, which consist of short cylindrical rollers held together by side links. The chain converts pedal power into forward movement. The groupset brand of a bicycle and number of gears determine the proper type of chain. Higher quality chains feature alloy coatings that are more resistant to wear and are generally lighter than their less expensive counterparts. Chains are wear items and are relatively inexpensive to replace, so which chain comes standard on a particular mountain bike shouldn’t factor into the buying decision.
- Front and Rear Derailleurs—the derailleur system moves the bike chain between the chainrings at the front and guides it from cog-to-cog on the cassette at the rear. The front derailleur pushes the chain between the two or three chainrings on the crankset. The rear derailleur is a spring-tensioned device that pushes the chain from cog-to-cog. In general, the left gear shifter on the handlebars controls the front derailleur, meaning it shifts between the chainrings; the right gear shifter controls the rear derailleur, meaning it shifts between the cogs on the cassette.

Rear Derailleurs
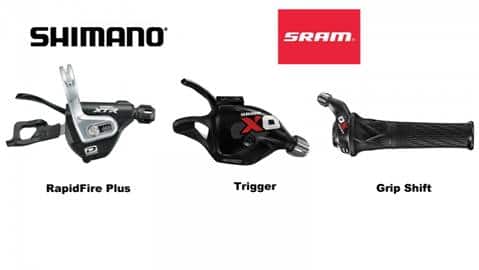
- Shifters—are the key mechanism for on-the-move changes of gear. Mountain bike shifters work by pulling cables to move derailleurs, guiding the chain onto different cogs or chainrings. There are three types of mountain bike shifters.
Twin-Lever Trigger Shifters—these are the most common type for mountain bikes. This setup contains two triggers—one for changing up a gear, and another for changing down a gear. Trigger shifters offer greater flexibility of positioning the shifter in multiple positions than twist shifters. That is, trigger shifters can be positioned in different locations on the handlebars and at different angles allowing for a wider range of shifter positioning for rider comfort.
Twist Shifters (also referred to as ‘grip shifters’)—these shifters work simply by twisting the mechanism that’s a part of the handlebar grip. This is a clean and simple looking setup, and they have gear indicators so riders can see at a glance the current gear. This option is also found on trigger shifters but much less common than on twist shifters.
Electronically Controlled Shifters—in 2014, Shimano introduced the world’s first production electronic mountain bike shifting system named the XTR M9050 Di2. It’s a battery powered shifting system that enables completely instantaneous shifts. The rider can also hold down the shifter to change gears across the entire cassette in one motion.
- Brakes—see Brakes section above.
Pedals
There are three main types of mountain bike pedals—clipless, cage, and platform. Each type has its advantages as well as disadvantages. Pedals can make a significant difference in a bike’s ride and performance.
- Clipless Pedals—are used in conjunction with cycling-specific shoes and metal cleats that bolt on underneath. You snap your foot into place and then it’s mechanically attached to the pedal similar to a lock-and-key. There’s usually a spring-loaded mechanism that releases the foot with a simple twisting motion of the foot. These pedals provide a stable connection to the bike that allows for very efficient pedaling, and they hold the foot in place even when riding over rough terrain. Clipless pedals are the most common type of mountain bike pedal.
- Cage Pedals (also referred to as ‘toeclip’)—you slip your foot into a cage containing a strap that adjusts around the top of your foot. They are a little more difficult to get into and out of than clipless pedals and aren’t nearly as efficient. Although they are the second most common type of pedal on mountain bikes, they are usually found only on lower-end models.
- Platform Pedals (also referred to as ‘flat’)—these type of pedals don’t offer any attachment between your foot and the pedal. They provide the least pedaling efficiency, but they allow for instant removal of the foot from the pedal. They are ideal for riders who need to put a foot down often or very quickly, and they are good for beginners as they learn to navigate challenging terrain on their new mountain bike.

Handlebars
Handlebar design, dimensions, and geometry greatly affects performance and comfort. Mountain bike handlebars are made of steel, carbon fiber, titanium, or aluminum, which is the most common type. The two most common types of handlebars found on mountain bikes are flat bars and riser bars.
- Flat Bars—these are the traditional mountain bike handlebars. As a general matter, flat bars tend to be lighter, stronger, and more durable than riser bars attributable to their simpler design.
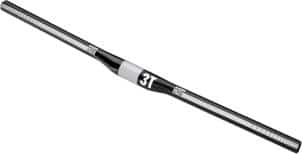
Flat Handlebars
- Riser Bars—are straight in the center and then rise up and straighten out where the grips, brakes, and shifters attach. This design puts the rider in a more upright riding position, which puts the rider’s weight farther back.
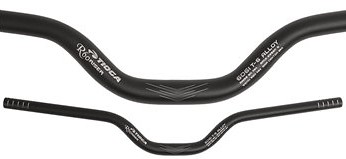
Riser Handlebars
When choosing handlebars, width and backsweep need to be taken into consideration, and for riser handlebars, rise is also an issue.
- Width—in general, mountain bike handlebars should be approximately four to six inches wider than your shoulders. Of course, this may vary depending on your personal preference and riding style. Wider handlebars provide more control when riding downhill due to their greater stability and leverage. On the other hand, shorter handlebars are more responsive for sharp turns and are more comfortable for climbing.
- Backsweep—refers to the degree which handlebars sweep back from a center line. Handlebars with zero backsweep are completely straight; whereas, handlebars with five degrees of backsweep, for example, are angled backwards five degrees from the center at each end. Backward sweep provides for a more natural and comfortable riding position for wrists and shoulders, and it allows for more efficient climbing.
- Rise—refers to the upward bend or rise towards either end of riser handlebars. Rise can be as crucial to comfort and performance as width or backsweep. The amount of rise offered by handlebars on the market today ranges from about three-quarters of an inch up to about two inches. Since all riders have their own particular comfort zone for their arms, wrists, and shoulders, the ideal amount of rise is dictated by personal preference. Fork height, frame head tube length, and stem height also affect the ideal amount of rise for each rider.
Overview of Mountain Bike Gearing
Put very simply, gears enable riders to put out maximum torque at low pedal revolutions. The power required to move a bike is dictated by desired speed, combined weight of rider and bike, and gradient of the terrain. Power output is a function of torque (how hard the rider pedals) and cadence (how fast the rider pedals). It is generally accepted that riders are most efficient at maintaining a cadence of approximately 60 to 120 crank revolutions per minute (“CRPM”).
A wide range of available gears enables riders to remain in that optimum crank revolutions per minute range regardless of the speeds and terrain. That explains why mountain bikes designed to climb trails across a wide gradient range tend to have a greater number of available gears than mountain bikes purpose-built for downhill riding or riding primarily on flat surfaces.
For a basic understanding of gears, it’s important to know about the different cogs on the cassette at the rear of the bike and the chainrings at the front. On a cassette, the small cogs provide higher gears, and the bigger ones provide lower gears. On a chainring containing three rings, the inner (small) ring is used for steep climbing; middle (medium) ring for smooth riding and easy climbing; and outer (large) ring for riding fast on relatively flat terrain.
For mountain biking, the basic guide for shifting gears is to do so when pedaling becomes either too hard or too easy.
- While riding uphill and it’s too difficult to maintain pedaling within the optimum CRPM range, shift down.
- While riding on any surface regardless of the gradient, if the pedals are spinning too fast (it’s too easy and thus outside of the optimum CRPM range), then shift up.
It’s easy to get overwhelmed at first with all the numbers involved with mountain bike gearing, but figuring out how many total gears there are on a bicycle is simple. You simply multiply the number of chainrings by the number of cassette cogs to calculate the total number of gears. For example, a bicycle with three chainrings and a ten cog cassette has 30 total gears. How many gears you need depends, as with most things when shopping for a mountain bike, on how and where you plan on riding.
Final Thoughts
For most new mountain bike riders, selecting a particular bicycle brand should be less important than choosing the appropriate subcategory and features of a new mountain bike. Shopping for your first mountain bike can be a little overwhelming at first with the dizzying array of available choices in today’s mountain bike market. However, once you identify your riding style and preferred riding conditions, which bike is best suited for your needs becomes much clearer. We’ve provided the basic factors to consider in helping you narrow your choices. But ultimately, it all comes down to your personal preference—whether you like the fit, feel, and ride of a bike. So go to a local bike shop with a knowledgeable staff and don’t be afraid to ask lots of questions. And most importantly, take several bikes out for a test ride, so you can compare how they fit and feel.
If you found this in-depth guide helpful, please see our other guide entitled: Bicycle Buying Guide for Beginners, Part One: Road Bikes.
Appendix: Guide to Commonly Used Mountain Bike Terms
Ahead Set: A type of headset that fits on a fork that has a non-threaded steerer like those found on many mountain bikes.
Axle Path: This is the virtual course that the rear axle, and hence wheel, moves along as the suspension is compressed, i.e., when it hits an obstacle. There are certain handling characteristics that are defined by the axle path.
Bead: The steel wire or Kevlar cord at the base of the tire’s sidewall that locks into the rim lip to keep the tire in place. Kevlar or Aramid fiber beads are lighter and let the tire fold, but are more expensive and the tire is more likely to fall off if flatted.
Bedding In: The vital process of wearing off surface glaze and contamination on new brake pads and rotors through repeated stop/go cycles to get them up to full power. A few sprints and sharp stops should normally do the trick and achieve maximum stopping power and longevity.
Bite Adjust: Mechanism that allows the contact point of pad and rotor to be adjusted independently of lever reach. Also known as ‘contact adjust’. This allows fine-tuning of brake feel but adds cost and complexity, and some systems seem to compromise reliability.
Bite Point: The point at which the pads make contact with the disc and the brake begins to work.
Bleeding: Flushing the brake system through with fresh fluid to remove any air bubbles that can cause softness and under-performance.
Boiling: Overheating and expansion of brake fluid that causes the lever to lock up.
Bottom Bracket: Located at the junction of the frame’s seat and down tubes and consists of two bearing, one at either side, through which the pedal axle is fitted, enabling the pedals and crankset to spin freely. It is considered the engine room of a bike’s crankset.
Braided Hose: Hydraulic line using a woven metal layer for added protection against crushing and bursting. Using this can improve the response of the brake too.
Brake Jack: Brake jack is an extension of the rear suspension. It can improve tracking of the wheel, but upsets geometry due to the rear extending and the front compressing, causing the fork to feel harsh.
Brake Pad: A block of rubber-like material fastened to the end of a brake caliper. It presses against the wheel rim when the brakes are applied.
Brake Squat: Brake squat is compression of the rear suspension under braking. This can cause the suspension to feel harsher, but can actually balance the geometry of the bike as both ends compress together. Most mountain bikes tend to squat to some degree.
Calipers: Brake arms that reach around the sides of a wheel to press brake pads against the wheel rim.
Can: Cylindrical chamber housing the shock’s air spring.
Cantilever Brakes: Rim brakes with pivoting arms mounted on fork blades or seatstays, the cable coming to the brake looks like an upside-down “Y”.
Carcass: The fabric body of the tire made from overlapping weaves. A supple carcass enables the tire to deform around lumps for extra grip but is less stable at low pressures. A reinforced carcass is more protective and less wobbly at low pressures but heavier and less comfortable. Lighter carcasses are also more likely to get point punctures.
Cassette Hub: A type of rear hub that has a built-in freewheel mechanism and the gears slide on and are held on by a lockring.
Chain: A series of links pinned together that connects the chainwheel (chainrings) to the cogs (cassette) on the back wheel
Chainring: A sprocket attached to the right crankarm (drive-side) to drive the chain.
Chainstays: The two tubes of a bicycle frame that run from the bottom bracket back to the rear dropouts.
Clincher Tires: A tire in which the bead “clinches” the rim.
Cog: A sprocket attached directly to the rear hub on a single-speed bike and mounted on a cassette on a multi-speed bike.
Crankarm: A part, one end of which is attached to the bottom bracket axle and the other holds a pedal, whose forward rotation provides the leverage needed to power the bicycle.
Damping: The means by which the compression and rebound of the shock is controlled. Compression damping controls how the shock compresses under impact, by forcing oil through a series of valves, while rebound damping use the same method to control how a shock returns to its uncompressed state.
Derailleur: A lever-activated mechanism that pushes the chain off of one sprocket and onto another.
Diamond Frame: The traditional geometry for men’s bicycle frame, the principal parts of which form a diamond shape.
Disc or Rotor: The round braking surface of the brake that mounts on to the hub and sits between the brake pads.
Down Tube: The frame tube running from the headset to the bottom bracket. It’s one part of the main triangle on a bicycle frame.
Fade: Loss of braking power caused by rotor and pads overheating.
Fixed Gear: A cog attached to a hub without a freewheel; it always turns with the wheel, so coasting is not possible.
Floating Rotor: Rotor with steel braking surface on alloy spider to reduce heat build-up and allow for expansion.
Fork Rake (or ‘rake’): The shortest distance between the front axle and an imaginary line extending through the head tube downward towards the ground.
Fork Tips: The slotted tips of the fork blades into which the front wheel axle fits.
Freewheel: A removable component on the rear hub. It carries gear cogs on the outside and contains a ratcheting mechanism inside that allows the wheel to rotate forward while the pedals, chain, and gear sprockets remain still or move in reverse.
Hayes Mount: Now nearly universal brake mount on forks. It uses two threaded posts running parallel to the disc and a slotted caliper for easy adjustment.
Headset: the combination of cups, cones, and ball bearings that creates the bearing mechanism that allows the fork column to rotate inside the head tube so you can steer
Head Tube: The shortest tube in the main triangle. It’s the one in which the fork column rotates.
Hub: The center of a wheel consisting of a shell to which spokes attach and contains an axle along with two sets of bearings, bearing cones, lock washers, locknuts, and parts for attaching the wheel to the frame.
Hub Brake: Any type of brake (disc, drum, or coaster) that operates through the wheel hub rather than the rim
Hydraulic Brake: A brake relying on a sealed fluid system instead of a cable for operation.
Instant Center (“IC”): The instant center of rotation is a virtual point in space—for a split moment in time it can be said that all other points are revolving around the IC for that instant. The IC migrates as the bike moves through its travel and will be at a different spot at different points in the travel.
IS Mount: International Standard brake mounting using two drilled tabs parallel to the disc.
Kevlar: An Aramid synthetic fiber material used for durability and flexibility in tire beads and flat protection panels.
Leverage Ratio: This is the ratio of wheel travel to the shock compression. A 2:1 ratio with 4in wheel travel at the axle gives 2in of shock shaft travel. With many designs the figures vary through the travel. Values between 2:1 and 3:1 are used currently. Higher leverage ratios equal higher stress on the shock and less sensitivity to small bumps.
Modulation: The relationship between how hard you pull the lever and how hard the brakes stop.
Mono-Block: Caliper forged or milled from a single piece of material, rather than two halves bolted together.
Multi-Compound: Tires using different rubber compounds. Dual compounds are normally harder in the center or underneath for fast rolling and long life, but soft on the shoulders for cornering grip.
Organic Pads: Softer, quieter but shorter-lived brake pads.
Pedal Bob: This is the feeling of bobbing the rider experiences due to the pedaling/drivetrain influence on the rear suspension, and how our mass reacts when we accelerate. It’s exacerbated by a choppy pedaling style and dynamic rider weight shifts. Certain pivot locations use the chain tension and drive forces to counteract the tendency to bob.
Pedal kickback: With too much chain growth, if you hit a bump while pedaling, the pedals want to kick back. When this force is opposed by you pedaling, it acts to stiffen your suspension. Most designs behave like this to some extent; however, certain set ups may actually compress the suspension further. This happens when the axle path gets closer to the bottom bracket and can be seen on some floating pivot designs.
Pinch Flats: Tire flats caused when the tube is pinched between the rim and a sharp or hard object.
Pots: The pistons or cylinders of the brake. Single-pot brakes have one piston on one side and one fixed pad; twin-pots have a piston on each side; four-pots have two pistons on each side; and six-pots have three.
Progressive: Power that increases in direct relation to how hard you pull the brake lever.
Pump Out: Over-extension and eventual lock-out of lever caused by fluid overheating and expansion on long descents.
Rear Triangle: A frame triangle formed by the chainstays, seatstays, and the seat tube.
Rim: The metal hoop of a wheel, which contains the tire, tube, and the outer ends of the spokes.
Riser Handlebars: A mountain bike handlebar that bends up on the ends. They are commonly found on Downhill, Freeride, and some Cross County mountain bikes.
Rolling Resistance: Friction created when tires roll along the ground.
Saddle: Seat on a bicycle.
Sag: The suspension travel caused by the weight of the rider sitting on the bike when it is stationary.
Seatpost: Part to which the saddle clamps and runs down inside the seat tube.
Seat Tube: The tube that runs from just below the saddle down to the bottom bracket.
Squat: Squat refers to how the rear end of a suspension bike sinks under acceleration in response to rider pedaling.
Shoulder: The edge tread on a tire that provides off-camber and cornering grip.
Sidewall: The bare side of the tire.
Steerer Tube: The tube that forms the top of the fork and rotates inside the head tube.
Stem: The part that fits into or on the fork and holds the handlebars.
Suspension: Many mountain bikes, and some road models, feature forks and frames that absorb road and trail shocks to improve comfort and control.
Suspension Rates: There are three types of suspension rates: progressive, linear, and falling. Progressive suspension stiffens up at the end of the shock travel. This is a typical Cross County mountain bike setup. Falling rate suspension feels super plush at the end and is much easier to blow through the travel, i.e., bottom-out, while a linear setup feels the same throughout the full range of travel.
Top Tube: The horizontal tube that connects the seat tube with the head tube.
TPI: The number of threads per inch in the tire’s carcass. Tires with more threads are generally higher quality with a more subtle feel.
Tread: Patterns of rubber on tire that make contact with the ground.
Tubular Tires: Also known as sew-ups. This type of tire is used primarily for racing. A tube is sewn inside the tire, which is then glued on to the rim.
XC: Shorthand for Cross Country mountain bike.
As a beginner, this post makes me happy because now I know what would suit me, and how to better make an informed decision on the bike to get.
Bote, I am glad this helped you.
Very in-depth article that is great for beginners. Learning the rules of the road and being safe while biking is very important. I feel as though most people would assume to signal the way they were taught in driving classes. But, it’s much more simple to tell drivers exactly where you are going for your own safety. This article is also great for drivers. Thanks man.